Tuesday, January 31, 2012

Jake and the Neverland Pirates Party -activities, pinata, cupcakes

We had a great party for little Miss Chloe on Saturday.  She LOVES Jake and the Neverland Pirates, so we had that for our theme.  I already shared the invitations with you, but here is the party. 

I used Kleenex boxes and other assorted boxes to construct some treasure chests -then I papie mached them and painted them yellow.  When the kids got there, we let them decorate their very own treasure chest.

I had some rhinestones from the Dollarama, white glue and markers.  If your kids are older you could use paints and other decorations, but I didn't want a giant mess with a bunch of 3 year olds.

The kids were allowed to dress up if they wanted, but Chloe (right) didn't want to be just a pirate... so she is a pirate princess. haha.

Here are some of the masterpieces.

I cut up some big triangles from scrap flannel I had and then zig-zagged around the edges to make each child a bandana.  The fabrics aren't all that pirate-y but oh well.  They got tossed in the treasure chests along with the loot from the pinata (more on that later!).

Then we played a pin the sword on Jake game.  I printed it out here

We went to break the pinata but Captain Hook had taken it away!  Oh no!  So we got out Cubby's map (that I drew the night before) and set out looking for the pinata.

We started at Butterfly Bluff.  I got out our Pooh's Blustery Day game and we tried to catch some butterflies.  Ignore the tree in the background -my mother in law is a crazy person who leaves her Christmas decorations for a LONG time.
I didn't get any pictures of the other parts of the hunt.  Next, we had to cross Mermaid Lagoon.  I put a blue sheet on the floor, then we sprinkled "pixie dust" on everyone and Paul and I flew them over the Lagoon.  After that we went through Tiki Tree Forest (aka the hallway, with paper trees on either wall).  And we found the pinata!

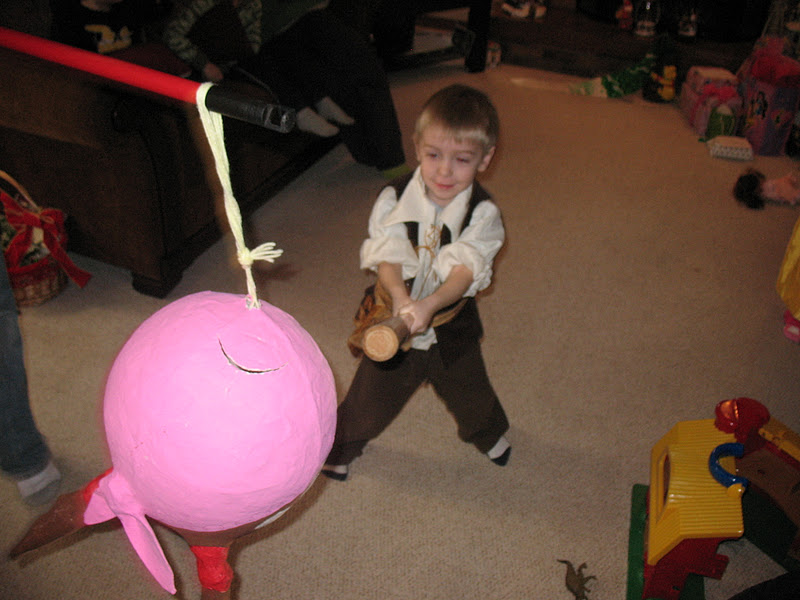
I was pretty happy with how the Izzy pinata turned out.  I wish I had made ears that stick out instead of just painted on, but Chloe liked it.

Here is the loot.  Chocolate coins, butterscotch candies and gold wrapped peanut butter cups.  I tried to get candies that could pass for treasure.  And I found those cool fake diamonds at Dollarama.  I also threw in some necklaces.


And some action shots.


I actually made a "Team Treasure Chest" so we could put all the pinata loot into that and I could sort it out later into their little treasure chests to make sure everyone got the same amount.... I guess I missed getting a picture of that.  I will take one later and put it up.

Then we had cupcakes and ice cream.  I made the toppers out of fondant.  The faces are just a circle and then I cut other shapes for hair, bandanas, etc.  I drew the faces on with edible markers.  I put them on a cookie sheet and lightly covered them with plastic wrap until the day of the party.  Then I laid them on top of iced cupcakes. 


Give us cake!

After cake was presents ... and then, because we over estimated how much time a party with 3 year olds takes, they played until all the parents got there. 

Monday, January 30, 2012

Jake and the Neverland Pirates Party - Invitations

Remember the Shaker Valentine's Day Cards I made earlier this month?  Well, I thought it would be fun to do the same idea for Chloe's birthday invitations.

She had a Jake and the Neverland Pirates themed party, So I printed off Izzy, Cubby and Jake, and a treasure chest.  And then filled it with chocolate coins. 

Then I made a little scroll with the words, "Shake your pirate booty on over to Chloe's Jake and the Neverland Pirates birthday party!" on it.  Pun intended.  Paul was mocking me a bit, but I thought it was clever. haha.  Then I just printed out a little sheet with the date, time and address on it... but that's boring so I didn't take a picture.  They were a big hit.


Friday, December 30, 2011

Foodie Friday #20 - Pepperoni Pizza Monkey Bread

I can't believe it's almost the new year already!  I hope everyone has a great New Year's Eve tomorrow.  I wanted to say a big THANK YOU to all of you, my readers.  It still sounds weird to me to say that I actually have READERS.  I can't believe how much my tiny blog has grown since I started it -and that, of course, is all thanks to all of you.  So THANK YOU so much!


We tried this recipe I found on Pinterest for Pepperoni Pizza Monkey Bread (Pull Apart bread).  It's from Confections of a Foodie Bride.  It turned out pretty good, and I love the idea.  But I think I'm going to stick with normal pizza for awhile.  At least until my kids are a bit older.  It seemed to take me 3 times as long to get it ready to put in the oven, just because they were crazy and whiny (probably because their dinner wasn't ready yet!).  They enjoyed it when it was ready, though...


...in between making faces for the camera! haha.

Happy New Year!

Wednesday, December 7, 2011

Chocolate Chip Cookie Dough Fudge


Ok, I'm in LOVE!  I found this recipe for Chocolate Chip Cookie Dough Fudge by  Bake at 350 and instantly started day dreaming about it.  Cookie Dough Fudge? Seriously?  Two of my favorite things, combined?  How could you possibly go wrong?
But ... I didn't have cream in my fridge... and I didn't have dark brown sugar.  But I had to have it -like RIGHT NOW.  But I found this on Pinterest as well.... Substitute evaporated milk for heavy cream!  And I figured I'd just give it a shot with regular brown sugar instead of dark.  I also used regular salt instead of kosher (I don't really know the difference).  So, unsure if this would be a success with all the substitutions (especially after my Funfetti Fudge FLOP), I went ahead with my fudge making adventure.

So, with my revisions, here is the recipe:
oil for the pan
1 & 3/4 c. sugar
3/4 c. brown sugar
1/2 c.evaporated milk
1/4 c. milk
1 TBSP corn syrup
3/4 tsp. salt
2 TBSP unsalted butter (I used hard margarine instead)
1 tsp. vanilla
1/2 c. flour
1/3 c. semi-sweet chocolate chips


SUCCESS!
Check out the full instructions here
It will change your life... well, maybe not drastically, but still.  It is delicious -and deadly (I have been munching on it LOTS).  It was even better after sitting in the fridge for a day.  I will DEFINITELY be making this again soon -and it whenever "soon" is, it won't be soon enough!

Merry Christmas, everyone!

Saturday, November 26, 2011

Papier Mache Santa Ornament


In case anyone missed it before, I decided to post the tutorial for my Papier Mache Santa that I shared over at Sugar Bee Crafts a couple weeks ago.  Enjoy!

You will need:
-wire (or coat hanger)
-newspaper, flyers or old phonebook (not glossy works best)
 -masking tape
-flour
-salt
-paint
-thread (or embroidery floss, etc)

First, you need a length of wire.  I just used an old wire coat hanger, but any wire about that thickness should work fine.  I bent a crook for the hat.


Then get out your newspaper (or flyers or old phone book... that's the thing about papier mache -it's very forgiving!)

 Tear into strips along the grain (it will rip fairly straight).


Get some masking tape strips ready (this will make it easier later on when your hands are busy holding things together).


Take some newspaper and start wrapping it around your wire (keep it tight!). 


Keep wrapping more and more newspaper, moving along the wire.  Go back over places where you want it thicker (ex: the point of the hat will have less paper than the base).


Use your masking tape to hold things in place as you go.  Remember to keep it all tight!  Keep tension on your tape!


I used some well-placed wads of newspaper (taped on really well, of course) to give the face some shape.


And add some small wads on for plump little cheeks!


Then I took a couple strips together and twisted them to make the "brim" of the hat.


I decided to make his beard curly, just for fun.  Twist your wire into the shape you want.


And continue wrapping paper and tape around it ...


Until you have it looking the way you want.

 You can add some small wads to make the cheeks even plumper....


Or maybe add a nose...


I twisted some paper to make a mustache and chin.


And rounded the back of the head a bit.


 Add another wad of paper to the tip of the hat and secure it with tape.


And then I decided to twist some small strips to make brow bones/eyebrows.


Ta-da!  Now that we have our base, we are ready to papier mache!  

First, make a paste with flour.  I started with about 1 cup of flour (no need to use any fancy schmancy breadmaker quickrise stuff - the cheaper, the better in my books).  Throw in some salt (less than 1/4 cup -I never measure... it's not rocket science).  Then add WARM water until you get a gluey consistency (about a cup -maybe a bit more).  Why WARM water, you ask?  No reason other than it just feels so much nicer on your hands.  This is not exact -it will work if the measurements are slightly different than mine (my measurements are different every time, so don't worry).  This made enough glue for me to do all of this ornament and something else I was working on -so you might want to half it.  Use your fingers to mix it and squish out any flour lumps until it is smooth.  I put down a garbage bag on the table to make clean up easier!


Now, there are two ways you can do this -it's just a matter of preference.  The first way is to dip your strips of newspaper into the glue


And then use your thumb and fingers to squeeze the extra glue out.  Hold your paper between your thumb and your fingers while you run your fingers all the way down the length of the paper. 


Then place the paper on your ornament.  Use your fingers to smooth it down and squish out any air bubbles, lumps, or wrinkles.  And to mold it to the shape of your santa.  Keep adding paper -overlapping -until the whole thing has several layers (about 4).

The second way (and one I actually use more often) is to use your hands to put a thin layer of glue onto the santa.  Then place your strips on dry and use your hands to apply the glue on top.  If you use this method, make sure you keep your hands WET with glue and always completely cover each strip of paper.  You may want to quickly apply a thin coat of glue in between layers.


Here he is with 3-4 layers on him.


Now do one more layer, but this time use plain newsprint or white paper.   It will make it easier to paint after it's dry.  I didn't have any plain newsprint and didn't want to use printer paper, so I just used some white lined paper -at least it's whiter than the newspaper.
 Put your santa on the garbage bag to dry (it will do faster if it's somewhere warm like a heating vent).  I like to turn it over every so often so it doesn't get flattening anywhere.
When your santa is COMPLETELY DRY, you can move on to the next step.

Take a large needle and poke a hole all the way through the top of your ornament to make a small hole.


Thread a smaller needle (I used red thread -and doubled it over).  Then tie a knot or two. Make sure the thread that does not go THROUGH the papier mache is on the back so you won't see it when your santa is hanging up.


Now your thread is 4 strands thick.  Loop it back down to the other knot(s) and tie it on to make a strong loop. 

 Now you can start painting!


 I used a felt tip marker to outline the eyes and mouth.


And for the beard I used a large brush and thick white paint (I used my artist grade white paint-the kind that comes in the jars, but you could also use that kind that is supposed to look like snow) so his beard had some texture.

Ta-da!